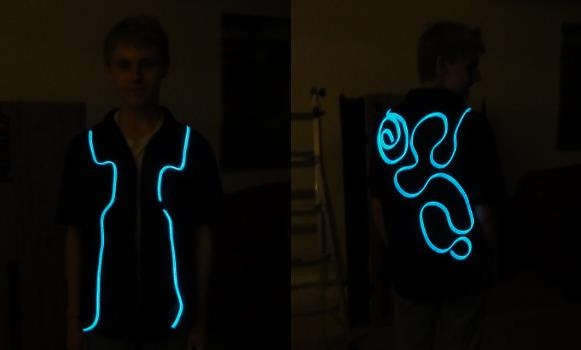
Have you ever wanted to create a light up shirt or jacket of your own? Then this guide is for you! By giving you step-by-step instructions and a detailed list of materials needed, you’re guaranteed to have a glow in the dark jacket that will really shine.
First, you will need to find some Electroluminescent wire (E.L. wire) instead of a strip of LED lights because E.L. wire is far more flexible, durable, and can be cut to the correct length. It can easily be found on the internet, along with a battery pack, for $5 to $20, depending on the length, and it has a variety of colors.
Second, you will want to obtain the article of clothing you wish to decorate with lights, preferably in black because it compliments any light on it in a dark environment. If you are making a light-up jacket or shirt, be sure they either have a zipper or series of buttons that go all the way down it. This allows it to be more flexible with the attached E.L wire.
Third, you will need an abundance of black thread, a few needles, and basic sewing abilities to bond the E.L. wire to the piece of clothing of your choice. Clear plastic thread does not work well and often strains the E.L. wire and causing it to fracture. Once you have the above materials, you are ready to begin creating your shirt or jacket!
Step 1: Lay the E.L. wire out on the shirt holding it in place by pinning over it with one of your many needles. E.L. wire can not make designs that have ninety degree angles, bending it at such a hard angle will break it. Make sure the battery packs are towards the bottom so they can extend and be concealed in the pocket of your pants, or jacket pocket. Also, make sure the E.L. wire does not run under the armpit of the shirt or jacket; it will fracture quickly while worn on account of constant arm movement.
Step 2: Once the E.L. wire is laid out exactly how you want it to be on the shirt or jacket, you are ready to begin sewing. You will want to sew small loops around the E.L. wire connecting it to the shirt every six inches or so on the E.L. wire. Make sure the loops are loose, and allow the E.L. wire to slide slightly through it, allowing it to move freely as you wear the shirt or jacket.
Step 3: Test it by wearing it and seeing if the E.L. wire jets out from the shirt in any places. This is a sign that more loops need to be sewn around that area to keep it down on the shirt. Add one or two more loops until it is in place. Repeat until the E.L. wire is perfectly in place to your liking, while still allowing some movement for it.
Step 4: Add batteries to the battery packs and enjoy your finished product.


