Simple Crochet Hats
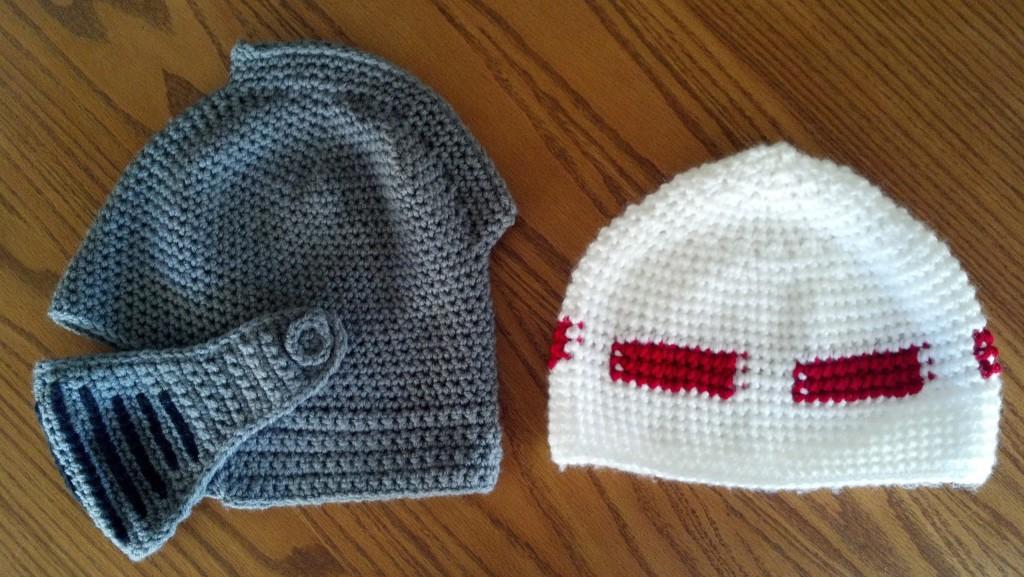
Photo credit: Marti Weary © 2013
By changing just a few parts of the design, a simple beanie can be made into a knight’s helmet. The helmet only has a fin, neck guard, and face guard to differentiate it from the plain hat on the right.
December 7, 2013
A simple crochet hat is a perfect project for beginner and master crocheters alike. They also make good gifts or personal accessories. This basic pattern can be left as-is, or can serve as the base of a more complicated hat, such as an earflap hat or “helmet” type hat.
Basic Steps
-
Make a flat circle. Make it larger and larger until its diameter measures the circumference of the head/3.14. Depending on the stretchiness of the yarn, subtract .5-1” off of this.
-
Ex: Head circumference = 22 inches.
-
22”/3.14 = 7.006”
The yarn is *very* stretchy and the stitch is loose, so I will crochet until the diameter of my flat circle is 6 inches. If it were less stretchy, I would crochet until the diameter was 6.5 inches.
-
Crochet until the length of your hat is [(head circumference/10)*4]-.8
-
Ex: Head circumference = 22 inches
-
22”/10 = 2.2
2.2*4 = 8.8
8.8-.8 = 8”
The hat should measure about 8 inches in length from crown to brim.
Instructions
Key:
-
SC = single crochet (US)
-
DC = double crochet (US)
-
inc = increase
-
*words* = repeat until the instructions tell you to stop
-
ex: *SC in next 3 stitches and increase in next* around = single crochet once in the next three stitches, and single crochet twice in the fourth. Single crochet once in the next three stitches and single crochet twice in the fourth. Continue in this pattern until you reach the end of the round.
-
This pattern can be done in SC, HDC, or DC, but the pattern will be written in SC. Substitute DC for SC if you are using that stitch. The only difference in using either is in the beginning.
CH: SC 6 in magic ring & join (DC 12 in magic ring, if you’re using DC)
Rnd 1: *inc* in each stitch around
Rnd 2: *SC in next stitch and inc in next* around
Rnd 3: *SC in next two stitches and inc in next* around
Rnd 4: *SC in next three stitches and inc in next* around
Rnd 5: *SC in next four stitches and inc in next* around
Continue in this pattern until your circle has the right diameter.
Then, just crochet normally around until your hat is the right length.
Rnd X: SC in each stitch around until your hat is the right length.
Now, just weave in ends and you’re done! You now have a simple crochet hat; keep it for yourself, give it away, or add onto it by making a brim, earflaps, or decorations. You can also try changing colors in the middle of the hat to make a stripe or two. Experiment with different styles and designs, and practice until you find your favorite one.