

Welcome Spring to Your Home
March 10, 2014
This collection of spring themed DIY ideas are great for beginners and avid crafters. Both easy to complete, and a cute way to bring spring cheer, these ideas will be a hit.
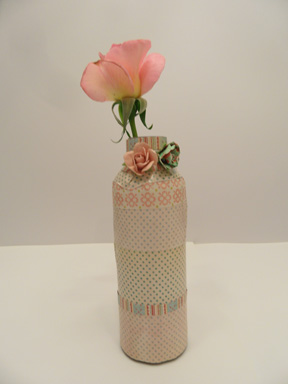
Decoupage Bottle-
Materials:
– A glass bottle (I used a Hubert’s Lemonade bottle)
– Various patterned scrapbook papers
-Scissors
-Mod Podge (I used Plaid Original Mod Podge)
– A paintbrush
-Paper flowers (Rose Parade Print Flowers from Michael’s– they come pre-made)

Step 1. Prepare the bottle by washing, drying, and removing any labels. The labels may leave a paper or sticky residue, but that’s okay. The residue won’t affect the finished product.

Step 2. Cut strips of the scrapbook paper to decoupage on the bottle. It doesn’t matter how thick you make them, as long as they are long enough to reach around the whole bottle. The strips look best if you vary their width. Make sure that the larger strips have a subtle pattern, so that the bottle doesn’t look too busy once you are finished.

Step 3. Paint the area where you are going to lay down your first strip, and carefully glue the strip down, smoothing it as you go. Paint over the outside of the strip with glue. Continue with the rest of the strips until the bottle is covered. Attach flowers using Mod Podge. Allow the bottle to dry for at least half an hour before using or displaying.

Step 4. Enjoy your unique vase. You can use it to hold pencils, flowers, or just about anything tall and skinny.
Tips: If you are a beginner with mod podge, you might want to experiment on other surfaces that are not as difficult to work with. Be careful when choosing a bottle that has curves or dips, because it is harder to form the paper strips around them. If you are not comfortable with mod podge this craft could also be made with alternating strips of washi tape.
Paper Pennant Banner-
Material:
– Twine, thread, or floss (I used Sew Easy Floss by We R Memory Keepers)
– Various scrapbook papers (at least four patterns)
– Scissors
– Tape or glue
Step 1. Cut around six feet of your string. You can use more if you want a longer banner; I just found six feet to be a nice, manageable size.

Step 2. The following image can be used as a template for the triangles. Trace the diamond template onto your scrapbook paper so that all of your triangles will be the same size. Cut out eight of them and fold the triangles in half.

Step 3. Space the pennants about five inches apart, and connect them to the string using glue or tape.

Step 4. Voilà, you have an adorable banner that works for parties, get togethers, or as an everyday decoration.

You could also decorate the pennants with ink stamps, or use washi tape (patterned scrapbook tape) to create designs. These banners could be made in sports colors for a game day, or in holiday colors to be used at a celebration.


