

Joe’s Photography Tip of the Week #3: Astrophotography
From the Milky Way to the moon, astrophotography gives us the ability to capture beautiful subjects thousands of miles above us.
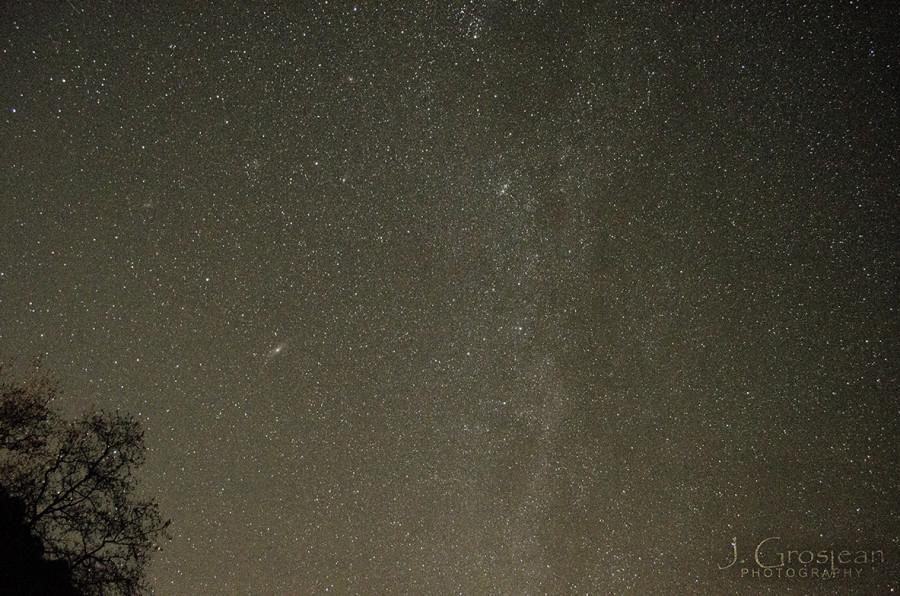
Photo Courtesy of Joseph Grosjean
Astrophotography can create beautiful portraits of the worlds above our heads.
August 29, 2015
In the previous “Tip of the Week,” I shared how to create star trails, an aspect of astrophotography. Astrophotography is capturing things pertaining to astronomy and space such as stars, the Milky Way, planets, and the moon. The example for this tutorial is capturing the Milky Way and our nearest galactic neighbor Andromeda. The difference is going to be that instead of having streaks of light going through the night sky, there will be beautiful, detailed points of light and possibly planets or the Milky Way.
Once again you will need a Digital Single Lens Reflex (D-SLR) camera and a tripod. As with all astrophotography, the most aspect is location, location, location! You are going to want to find a place away from the city and light pollution. I have had my best luck in the mountains of Payson, AZ, on cold clear nights. I mention cold, because cold air is easier to see through and has less distortions, than warm air. You should also check the weather before hand to make sure there aren’t going to be any clouds.
Now, onto the actual setting up and execution of the shot, first open up or assemble your tripod and place it where you want your shot to be. Next, attach your camera to the mounting plate and choose an interesting shot. Remember, the night sky is dark and your viewfinder won’t be much help so look around and find your shot, and point in that direction. Normally, I’ll find the Milky Way and aim in its general direction, but you can photograph other things like the Seven Sisters or Polaris.
Next, adjust your lenses focal length (zoom), so you have the smallest number selected (the most wide angle). For my setup, I use 18mm, but it will vary depending on your equipment. Then, set your camera in manual mode and set the exposure. For star trails, we used the “Rule of Four” (4 minute exposure at f/4, ISO 400), but we don’t want to capture the movement of the stars so we will use the “500 Rule,” which gives us shorter shutter speeds.
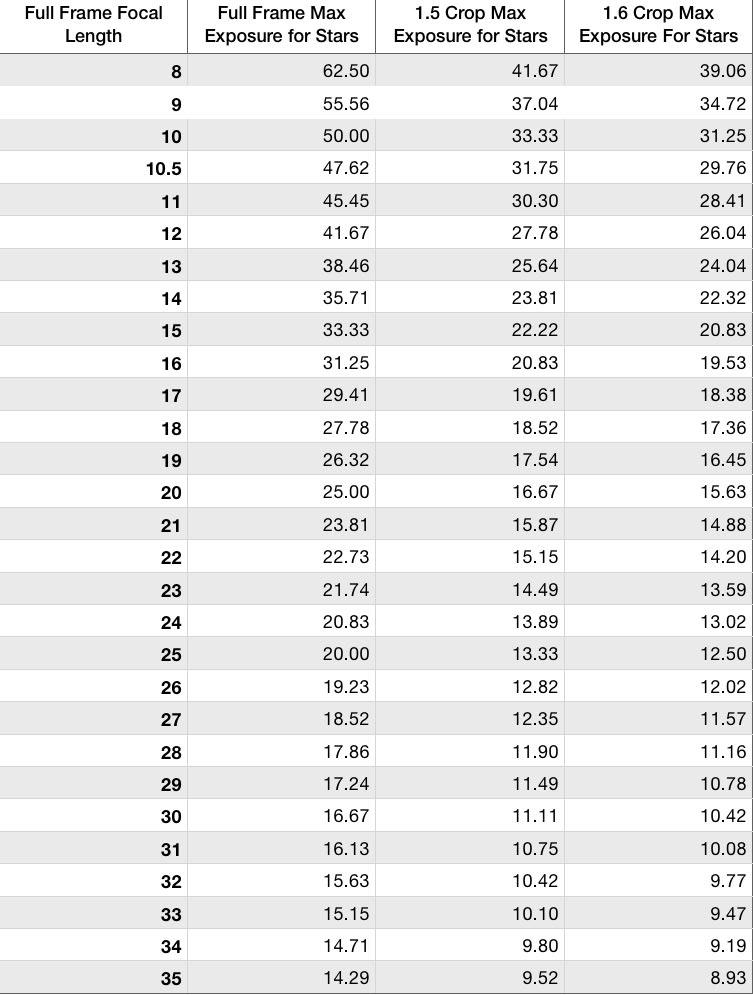
The “500 Rule”
First, find your focal length, then look at the attached exposure length. The exposure length listed is the longest the shutter can be open before the stars start to turn into streaks rather than dots. Next open your aperture all the way and start taking test shots, adjusting your ISO to get the correct exposure. Once you have that locked in we can adjust your focus.
If you have an older lens with a really precisely measured “infinity mode,” select it. If not we will use trial and error until we find the correct focus setting. Start on one side of the focus spectrum and take photographs in increments until you see the image get sharper, then fine tune it until the image is crisp. Now that you have all of the technical stuff down you can start taking photographs. As you go you might think of another angle. In this case just pick up your equipment and move it. You might have to continue to fine tune your exposure, but most things should stay the same.
Post-processing for this style is not very difficult as it will mostly involve mild color corrections and some brightness/contrast adjustments. I am going to leave this bit up to you, the artist, as each photo will be different. If you are looking for something specific you can leave a comment, or search for tutorials on Google and YouTube. Remember, the more you practice the better your images will turn out. Good luck and have fun!


